There are many reasons why you may want to take multiple exposures, from exposure bracketing to capturing fast changing events, to overlaying images to provide the feeling of movement, to merging for HDR and the D850 provides a raft of options for all of these purposes. It is capable of capture rates up to 9 fps, (or even 30 fps with limitations – see Live View below). And the good thing about digital cameras is that the only cost is battery power and your time filtering out the images you want to keep.
Release Mode
First mechanism is the Release Mode dial on the top left (looking from the rear). This allows you to select:
- Single – Single image per shutter release
- Continuous Low Speed (Cl) – Continues to take images whilst the shutter release button is depressed. Up to 6 fps ( 8 fps with theMB-D18 vertical grip fitted).
- Continuous High Speed (Ch) – Continues to take images whilst the shutter release button is depressed. Up to 7 fps ( 9 fps with theMB-D18 vertical grip fitted).
- Quiet – Single image, but quieter. (Note: Quieter – Not Quiet, and definitely Not Silent)
- Quiet Continuous – Continuous whilst shutter release is depressed. Fixed at 3 fps.
- Timer – Single image, but delayed shutter release
- Mirror Up (Mup) – Single image, but with the mirror up, so reduced vibration when taking an image. Note Mirror up does change how auto focusing is performed (switches from Phased to Contrast) and alters how Matrix Metering performs.
A trick: I find Quiet Continuous – Qc – great for exposure bracketing. I usually execute exposure bracketing at 3 frames with a 0.3 or 0.7 Ev change. Quiet Continuous gives me any easy 3 frame sequence, with probably not a lot changing between the images
Exposure Bracketing
Whilst turning on Exposure Bracketing of it self does not switch the D850 into a multiple exposure mode, it does link a sequence of images. With Exposure Bracketing you set the D850 up to take a series of images at varying exposures.
To set up bracketing hold own the Bracketing button. Top Front Left view finder. Use the main dial to selected the number of frames to take, and the exposure distribution, and the sub dial to set the exposure value. By default you can choose 3, 5, or 7 frames, distributed either all -ve, all +ve, or either side of D850’s selected exposure. The exposure increments are, by default, 0.3, 0.7, 1.0, 2.0, 3.0
Multiple Exposure Mode
This, as the name suggests, is the option that the D850 provides to fully combine between two and ten exposures using any format including RAW. So, if you truly want some fun with multiple exposures, this is the option to choose.
To enable go to the Photo Shooting menu and near the end of the options you will find the Multiple Exposure option. Entering that option enables you to:
- Switch Option ON for a single set of images
- Switch Option ON and leave it on
- Set how many images to take. 2 – 10
- Set how to combine
- Add
- Average
- Light
- Dark
Here are examples I took of the working of an old mantle piece clock. The clock has a small pendulum normally hidden away inside. The image on the left is a single image with a slow shutter speed. The image in the middle is of ten photos of the clock which the D850 averaged to produce the motion of the pendulum. The image on the right is of two photos taken using a flash which again the D850 has merged into a single image.
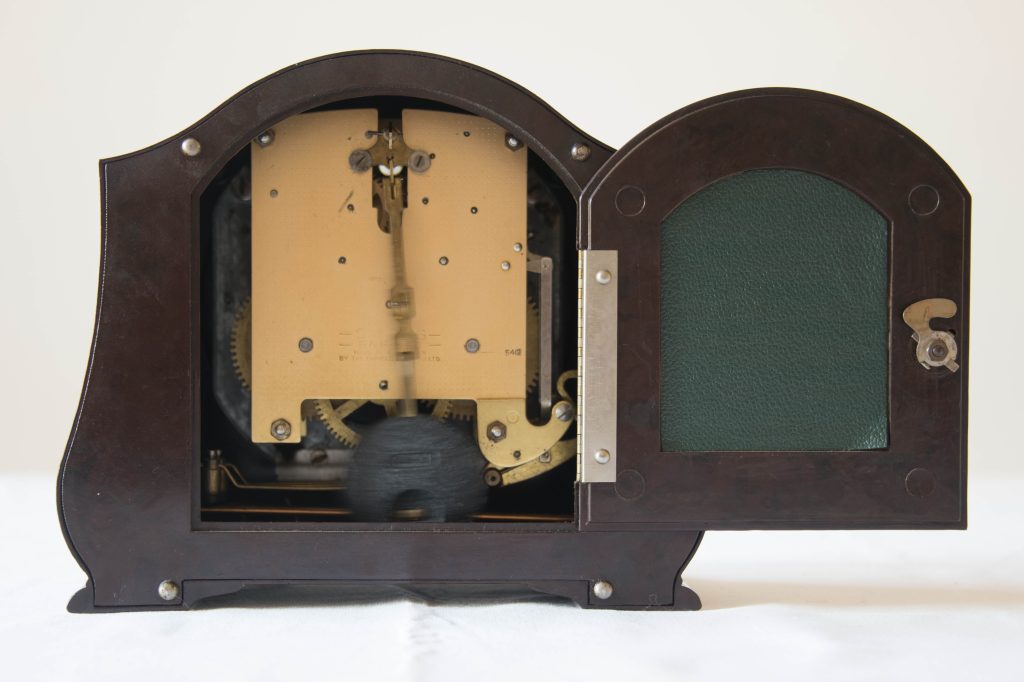
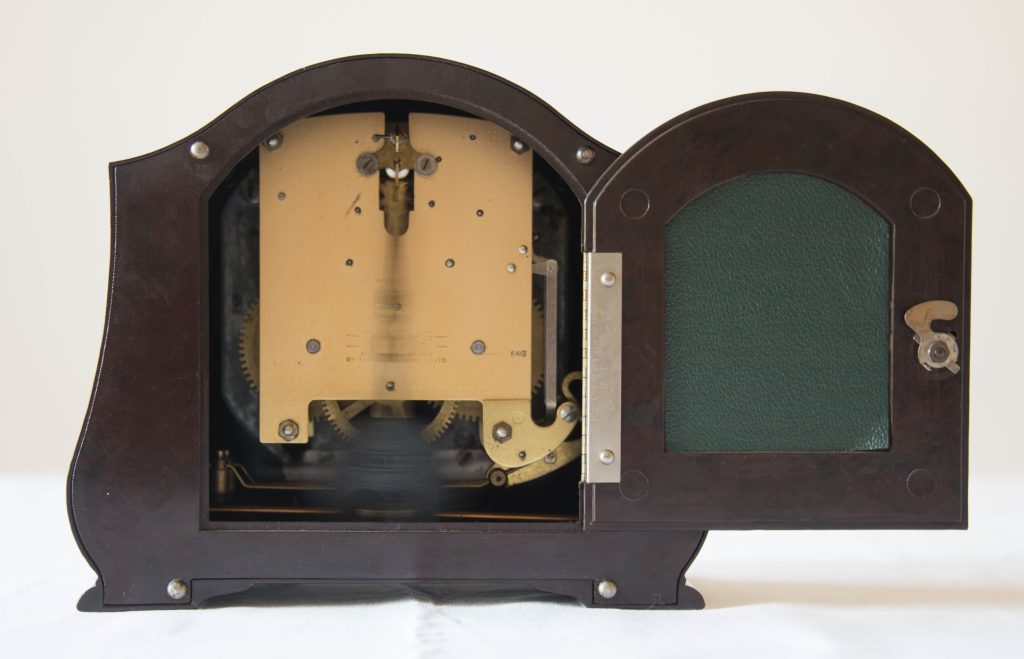
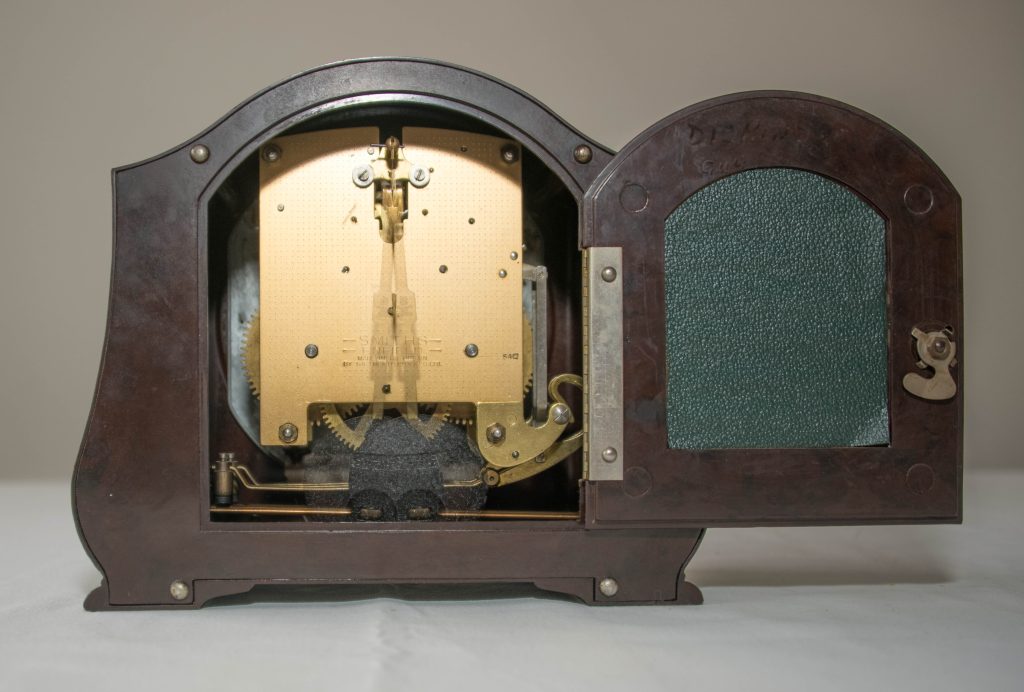
I have to admit that the Multiple Exposure mode is actually a lot of fun.
Live View – Silent Mode
The D850 has yet another trick of taking multiple images, but this one is a bit different. It is only available in Live View, and basically you are using the D850 as a video camera, but instead of creating a video you are creating images at a rate of 30 fps. The caveats to this though are:
- Image capture is DX, not FX, & resolution is 19.5 Mega pixels
- Encoding is JPEG
- Maximum number of images is 90 (i.e. 3 secs)
- Uses an electronic shutter – some banding may be noticeable with fast moving objects.
However, one really great benefit of this mode, is that it truly is silent.
To enable you need to:
- Switch to Live View
- Press the ‘i’ button on the back
- Select Option 2.
To cancel simply switch back to View Finder mode or turn the camera off.
If you want to capture action, and are comfortable accepting a resolution of 19.5 Mpixels (which isn’t bad), then this feature is a great way of ensuring that you do not miss a single frame.
HDR – High Dynamic Range
The D850 provides a very limited HDR in camera feature. To be honest, it is so limited I wonder why they even bothered, given that Photoshop, Affinity, and probably every other image editing software provide much more sophisticated tools for merging and blending. The functionality will operate on only two images, it only works with JPEG (Not even RAW + JPEG), and cannot be used in conjunction with bracketing, multiple exposures, or time-lapse. However, for completeness, here is a description of the in-camera HDR feature on the D850.
The HDR feature is enabled in the Photo Shooting menu. You will need to scroll down to page three. Note, if the feature is grayed out, check your Image Quality setting is on JPEG only and your Multiple Exposure setting is OFF. Once enabled you then have two additional settings
- Exposure Differential
- Smoothing
Exposure Differential can be set to Auto, 1 EV, 2 EV or 3 EV. Smoothing can be set to High, Normal or Low. The exposure differential is pretty much self explanatory, the Smoothing controls the amount of smoothing that is undertaken merging the two images if they do not completely align, i.e. if you did not use a tripod and/or something in the image moved.
On the whole, not too impressed with the in camera HDR function of the D850. It seems a lot a faft for what can be executed much better in whatever softeare processing application you are using. Below is an example of the Nikon HDR.
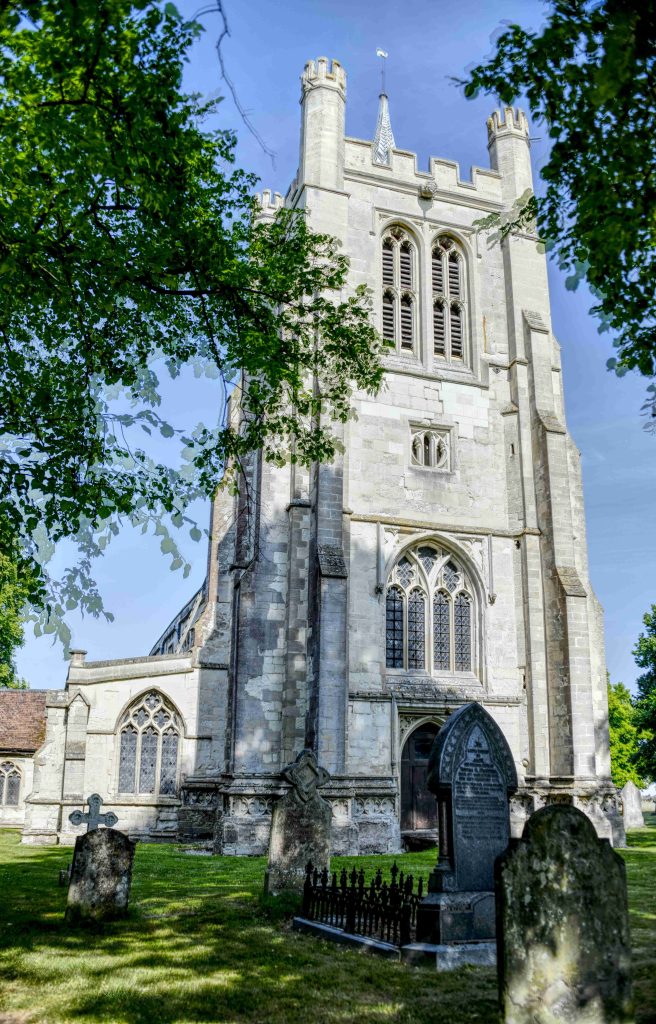
The images are of a church tower and the graveyard stones in front of the tower. The church yew tree is providing the shade over the grave stones, so you have the clash of the exposure of the brightly light church tower vs that of the shaded grave stones. On the left is the image exposed correctly for the tower. On the right is the image correctly exposed for the grave stones. In the middle is the Nikon’s HDR balancing image.
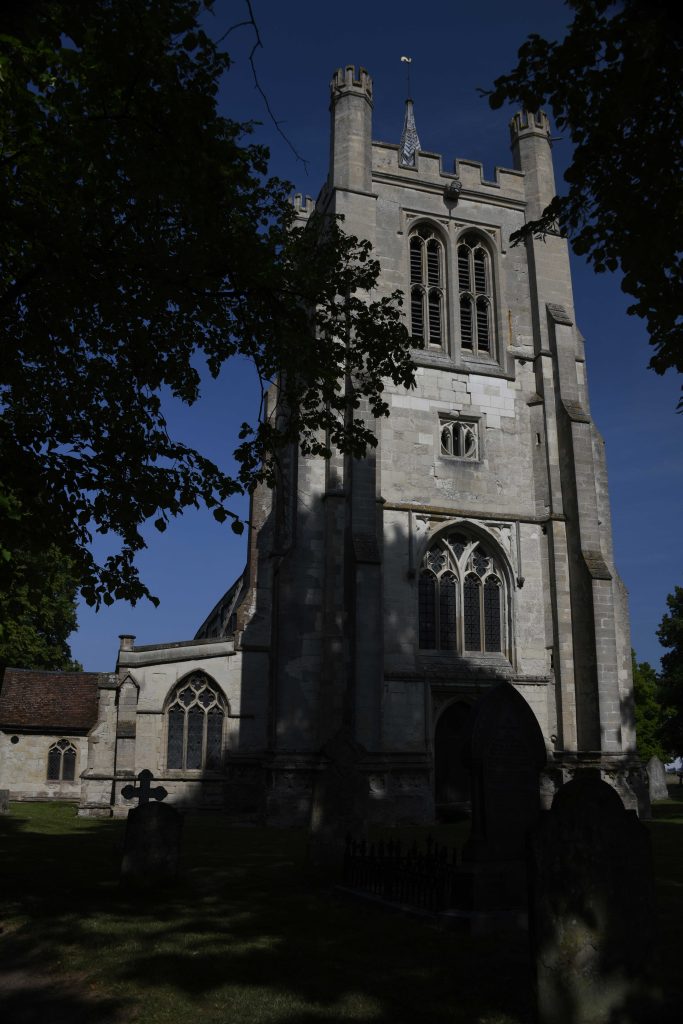
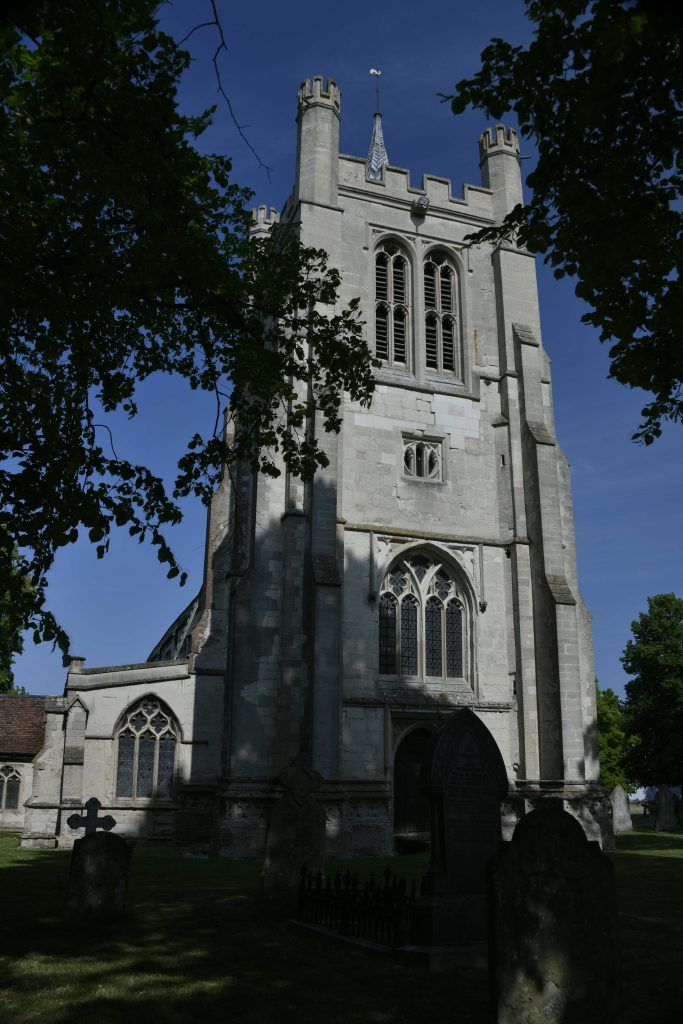
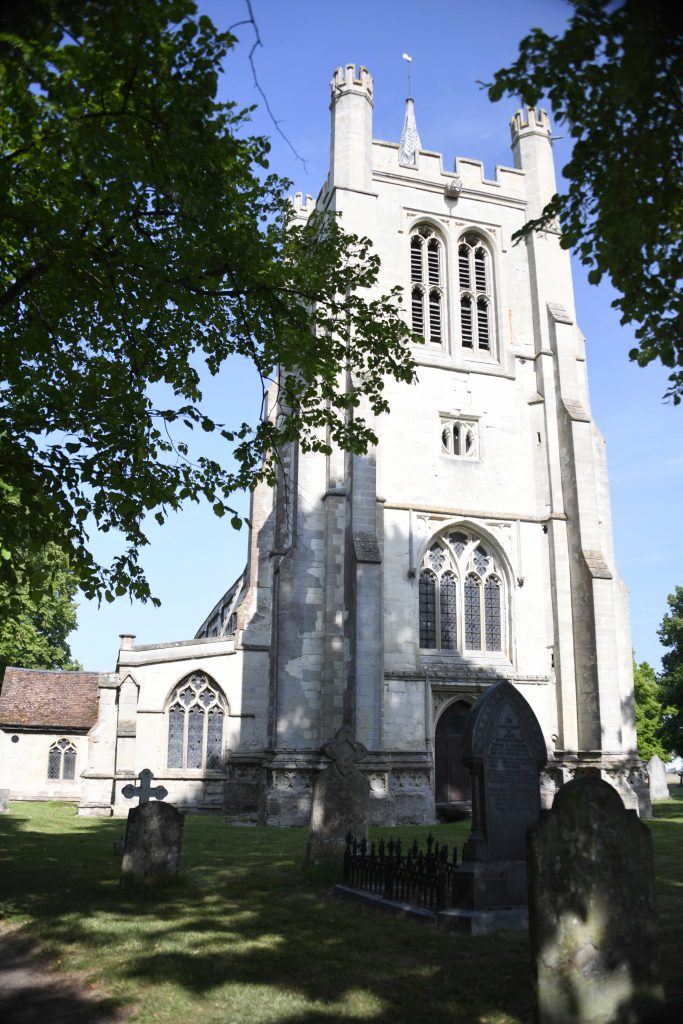
As you can see the left is under exposed in the shadows, and the right is over exposed on the church tower. The middle, which is reasonably balanced between the two exposures, still does not show the grave stones in their best light. (Forgive the pun). You really can do better using imaging processing software.
Here is what Affinity’s HDR functionality made of the two images. In my opinion it is a 0.5 – 1.0 Ev overexposed, and you do get the ghosting of the leaves, which have moved between the shots, but the detailing on the grave stones is exceptional.